Chapter 2: Building a circuit step by step
Building a basic circuit: the parts
We’re going to build our first circuit! You will need these parts and tools.
- breadboard
- 9V battery
- battery cap
- 1 LED
- 330 Ohm resistor (bands colored orange, orange, brown, gold)
- jumper wires
- needlenose pliers

Get all of your parts together to start building.
Building a basic circuit: step by step

We are going to walk you through the steps of making the basic circuit we have shown you throughout the chapter.
You may not understand exactly how all the parts in the circuit work together yet. Don’t worry about this yet, we will explain more about electricity in a circuit and about each component as we move forward. For now, just follow the steps.
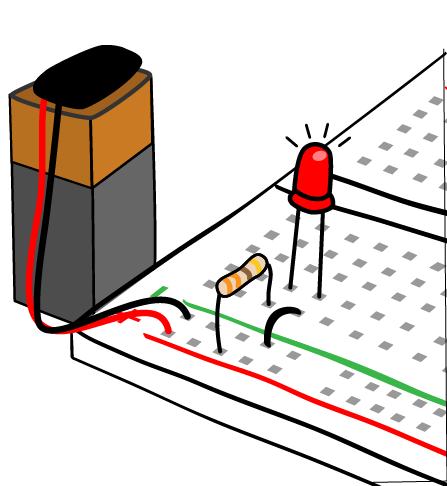
The first parts you’ll need are the breadboard and the 330 ohm resistor. Resistors get their own section later, but right now we just need one resistor that has four bands with the colors orange, orange, brown, and gold.
Pick one corner of the breadboard, we are starting with the upper left hand corner. (It doesn’t make a difference if you pick the right or left hand busses.) First put one end of the 330 ohm resistor (with bands colored orange, orange, brown, and gold) into the power bus (marked with the + sign) of your breadboard and the other end into a row of your board. You’ll have to bend the leads a little so you can get them into the board.
Resistors don’t have a forward or backward direction in a circuit, so it doesn’t matter what the orientation is. Each lead or leg is the same.
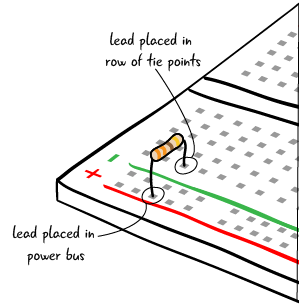
The components should feel like they are pressed in place. Sometimes it is hard to get the components all the way into the board. Just be patient. Some people find it easier to use a needlenose pliers to stick components into a board, while others just use their hands. See what’s easier for you.
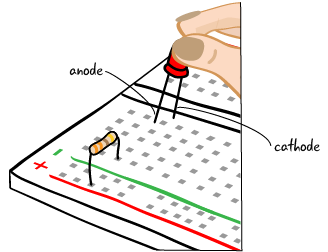
Add the LED
Next add an LED. The anode (long lead) goes in the same row of tie points as the resistor. The cathode (short lead) goes into the next row.
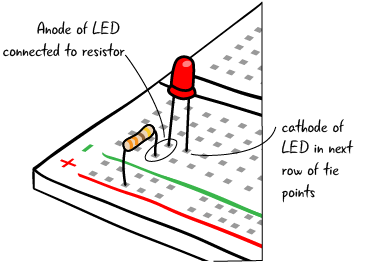
Add jumper and battery cap
Next, you should put a jumper connecting the ground bus (marked with the – sign) to the cathode of the LED. Using a black jumper will indicate that it is going to ground. The jumper is just there to make a connection between the cathode and the ground bus.

Add the battery cap into the breadboard power and ground bus. It has metal ends that will fit into the power and the ground bus. Make sure you get a secure fit into the breadboard which can be tricky. Sometimes twisting the wire at the end of the battery cap can help.

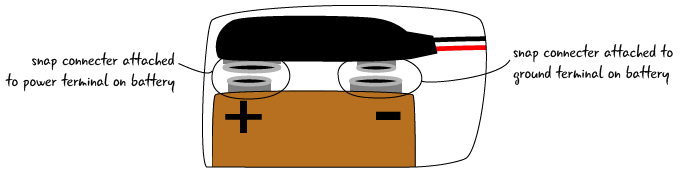
Attaching the battery cap
Let’s take a closer look at the 9V battery and at the battery cap.
The top of the battery has 2 terminals that attach to the snap connectors on a battery cap. The smaller one, next to the plus (+) sign, is the power terminal. The larger terminal next to the minus (-) sign is the ground terminal.
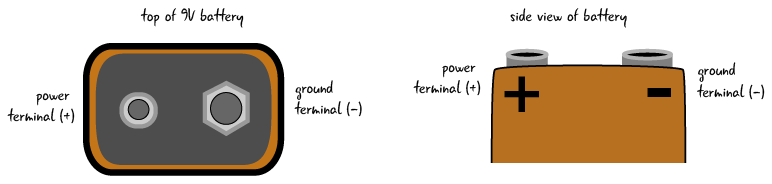
Turn over the battery cap, look at the two snap connectors. The small connector will attach to the ground terminal and the large connector will attach to the power terminal

The snap connectors will only attach properly if the battery is correctly oriented.
Let there be light
Now attach the battery to the cap. Your LED should light up! You’ve made your first circuit!
Congratulations, you’ve completed your first circuit.
This is just the first of many in the book, but feel good that you have turned on this first LED. Let’s look at how the battery is providing power to our circuit next.
Questions?
Q: What if I don’t have the resistor that you suggest?
A: We recommend buying a wide range of resistors initially to make sure that you have all of the resistors suggested for the first few projects and chapters in the book. While there are ways to combine resistors to change their value which we will look at in a later chapter, it is generally best to have a variety to begin with.