Chapter 5: Add a speaker and adjust the code
Adding a speaker
In this circuit, the button, LED, resistors and jumpers will stay in the same place. We are simply adding a speaker; everything else remains the same.
Part to add:
- 1 speaker
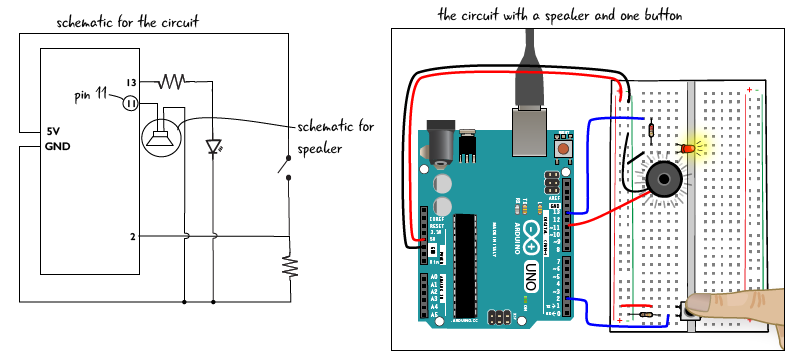
As always, before you attach the speaker, make sure your computer is not connected to the Arduino. Attach one end of the speaker to pin 11 on the Arduino and the other end to the ground bus. It doesn’t matter which end you connect where; like a resistor, the speaker does not have an orientation. The colors of your speaker wire my vary, but the speaker does not have a direction.

That’s all there is to adding a speaker.
Adding code for the speaker
Now that we’ve wired up the speaker, we will adjust the code. First, save the sketch as a new file, named ATG5_1_tonebutton.
We’re going to add a line of code to the sketch’s initialization section. We will add a variable for the speaker pin.

Let’s look at that line of code more closely. We can see that it is like our other variable declarations: there is a qualifier (which, as you recall, is optional, but we want in this case because the number of the pin that is connected to the speaker will not change), a type, a name, and a value. Remember, we use the const qualifier, which stands for constant, when we have a variable has a value that will not change.

Adjusting setup
What do you think we will have to adjust in the sketch’s setup section? Remember that setup is where we state whether the circuit’s various components are inputs or outputs.
What is our speaker? An output. So let’s add a line of code that will declare that the pin the speaker is attached to is an output. Because we made a variable to hold that value, we will use it when we declare the pin an output.
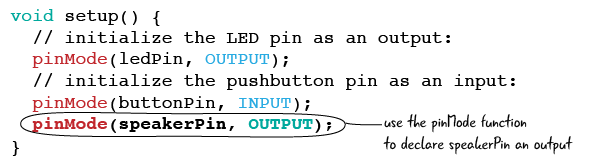
Here’s a closer look at this line before we move on to the changes in loop.
On to the loop!
Adjusting the loop
As we have seen, loop has the code that reads whether the button is pressed or not, then uses a conditional to direct the Arduino to do something based on that information. Now we will use the Arduino functions tone() and noTone() inside of the conditional. tone() will generate a note or tone, noTone() will stop it from being played. Let’s look at all of the loop code first, then at tone() and noTone() more closely.
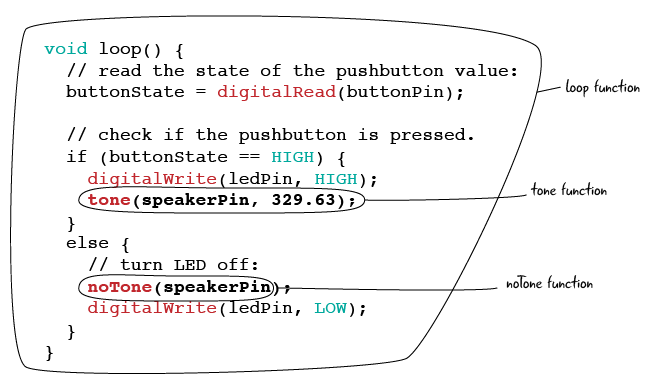
As we said, tone() will generate a note or tone which can play through the speaker we just attached. When we use the tone() function, we need to tell Arduino on which pin to generate a tone, and what note to play. It makes sense that we want to generate a note on the pin that has the speaker attached.
Let’s look at the tone() and noTone() functions a little more closely.
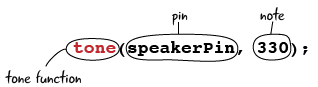
tone and noTone up close
What does 330 mean? We know it means the note the speaker will play, but how do we arrive at that number? The Arduino generates sound waves, that are measured in hertz; 330 is the hertz value of the note we want our circuit to play. In musical circles, this note is known as an E. From now on, when we mention the tone function, we will say that it is generating a note. Here are some of the possible note values.
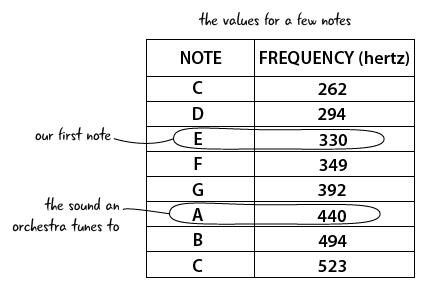
A more comprehensive note chart can be found on the Arduino website at:
https://www.arduino.cc/en/Tutorial/ToneMelody.
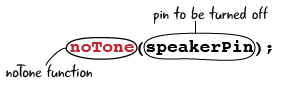
Now let’s look at noTone(). noTone() stops the sound from being played on the pin specified. In this case that’s speakerPin, which we know stores the value of the pin that has the speaker attached to it. If you leave out the noTone() function then your note will play continuously once you press the button the first time.
Add the tone() and noTone() functions to your code as shown on the last page, and save your sketch, then upload. Now when you press the button, you hear a note playing from the speaker, as well as seeing the LED turn on.
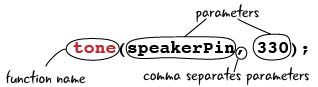
Remember when we said we would explain what’s inside of the parentheses in functions? For example, in the tone() function, speakerPin and 330? Those values are called parameters. Let’s take a look aat them now.
Parameters
We have used a number of Arduino functions in this book so far, from pinMode() to digitalWrite(). You may have also noticed that most of the functions we have used require something to be placed within the parentheses, often some combination of numbers and words. The values placed inside the function are called parameters.
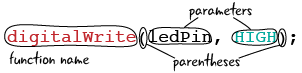
Parameters tell your Arduino function important information, such as which pins are used as inputs. Different functions often have a different number of parameters. digitalWrite() has two parameters, the pin number and the value, while the Arduino delay function only has a single parameter, how many milliseconds to pause the program. Some functions won’t need any parameters, while others will require several. Let’s look at the the tone() and noTone functions and how parameters work with them.
In the tone() function, there are 2 parameters passed in, the pin that the speaker is attached to (in this case, the variable speakerPin) and the value of the note. Note that the parameter values are separated by a comma.
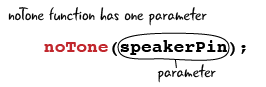
The noTone() function has one parameter, that pin that the speaker is attached to (again, the variable speakerPin).
Some functions have no parameters, while others have many. In some functions, not all of the parameters are required. We’ll see more about functions and parameters in later chapters.
Now, let’s add a second button to our tone button keyboard so we can play more than one note.