Chapter 5: Looking at the sketch: variables
What’s the code in this sketch?
Here’s the code for the ATG5_Button sketch. We’ll step through the details over the next few pages. (We’ve removed the code’s starting comments for the sake of brevity.)
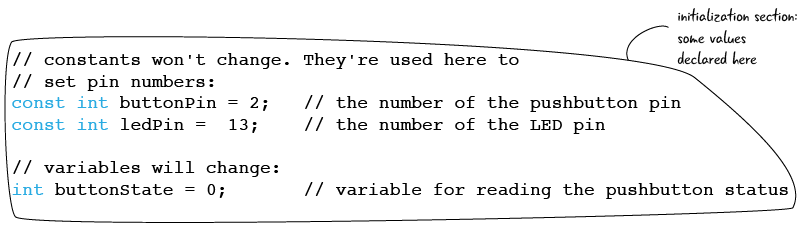
Initializing our code and variables
ATG5_Button is different from our ATG3_Blink sketch in that there is code that happens before the setup function. This initial code is aptly called initialization code: code at the very top of a sketch where you declare values that you want to have access to throughout your sketch. Let’s take a look at this sketch’s three lines of initialization code:

Initialization code declares values that you have access to throughout your sketch, including both the setup and loop functions.
All three lines of codes look similar; they all have some words on the left and numbers on the right with an equals sign in the middle, but what do they do? In order to understand about this section of code, we need to introduce a new programming concept: variables.
What is a variable?
In the simplest terms, a variable is a place to store a specific value and give it a useful name. Think of a variable as a container that holds a value. If you’ve taken Algebra, you’re familiar with variables. Remember equations where you were told things like “if x = 1”?
Variables can hold different types of values. For now we will look at variables that hold integers.
In the code line below, we are both declaring and assigning a variable. Declaring a variable means to give it a name, and assigning the variables gives it a value. We can declare variables without giving them a value, but we can’t give a value to something we have not yet declared.

a variable is a container that holds a value
Declaring variables
A line of code that defines a variable is called a variable declaration. Often Arduino code will also include a variable assignment. Variable declarations and assignments are not structured the same in all programming languages, we are only looking at how variables are declared in the Arduino programming language.
In the Arduino programming language, all variable declaration and assignments have at least four different parts: what type of data the variable contains, the variable’s name, an equals sign, and the actual value you wish to set for the variable. (Variables can have more than four parts; you’ll learn about a fifth part in a couple of pages.) Here’s the variable declaration and assignment from our initialization code with its various parts labeled:
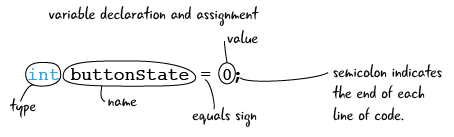
In the example above, we are putting the value 0 into a variable with the name buttonState that has a type of int, which stands for integer. Let’s look at all the parts of that declaration in detail. We’ll start with looking at the name, then looking at the value.
variable name
The name part of the declaration determines how you refer to your variable through the rest of your sketch. There are a few rules for selecting names: a variable name can’t start with a number, can’t have any spaces in it, and can’t be a word that the Arduino language already uses for another purpose (for example, we can’t name a variable “delay” since that term is already reserved by the Arduino language). There should only be one variable with a particular name for each sketch. It is considered best practice to name your variables something that indicates their purpose.
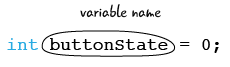
Variable names can’t start with a number, include spaces or symbols, or be a word used by the Arduino language.
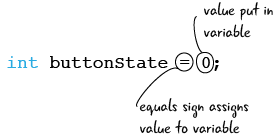
variable value
The value part of the declaration is what is stored in the variable. In this example we have a integer value of 0, which corresponds to the state, or voltage value, of our pin. Values are set using one “=” equal sign, which says that anywhere we see this variable’s name (“buttonState”) what we mean is “use the value 0” or “we are assigning the value 0 to this variable.
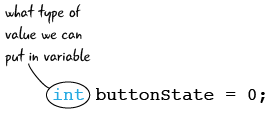
variable type
The type sets what type of information we can save within our variable. In the declaration we’re examining, int stands for integer, which means we can only save values that are whole numbers. Not all languages have typed variables, but in the Arduino language, you must declare the type of each variable in your sketch. Other types include float, string, character, and boolean; we’ll discuss these in detail in future chapters.
Now that you know about the four parts that are required in variable declaration, let’s examine one optional part that’s used in a couple of variable declarations in our sketch: the qualifier.
variable qualifiers
Finally, some variables also have a qualifier, which determines whether we can change the value of the variable after we create it. The qualifier “const” sets our variable to have a permanent value when we run the sketch. In this context const stands for constant. Here’s an example from our sketch:

It may seem a little strange to think of a constant variable, but remember that to set a variables just means to keep track of a value with a name. When we plug the wires into the pins of our Arduino, the pin numbers are not going to change. Since the value of the variable isn’t going to change, we add “const” to our declaration, which makes it clear that this is a constant variable. We will explain why you use constants later on in this book.
The qualifier is optional for variables; most variable declarations only have a type, a name, and a value.
As you can see from the initialization code below, our sketch contains two constant variables and one variable that can change:

Questions?
Q: What happens if I name my variable something that is not allowed?
A: The error console in the Arduino IDE will give you “unexpected unqualified id” warning, which will be displayed in orange text. The easiest fix is to change your variable name to something different.
Q: Do I need to use “const” for all of my variables?
A: No, it depends on what the variable is for. For example, in the HFA5_Button sketch, the pin variables will never change during the sketch, but the variable for the buttonState will. We want to be able to change the value of the buttonState variable, so we will leave “const” off of its declaration.
Q: How do I store values that are not numeric?
A: We won’t get into variable types besides integer for a few chapters since our sketches won’t require any other types. We will cover using strings to save characters and words later in the book.
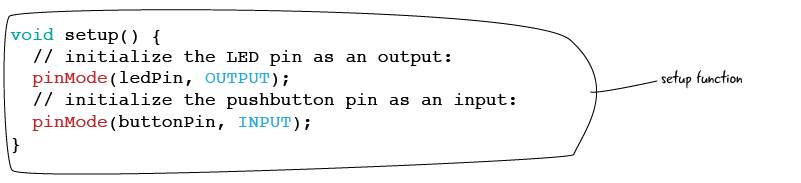
Setup for ATG5_Button
Now that we’ve looked at the ATG5_Button sketch’s initialization code, let’s move on to its setup function.
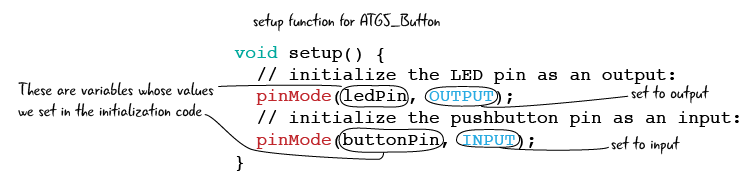
The setup function for our ATG5_Button sketch only has two lines of code. Similar to the code in Chapter 3, we are setting a pin to be an output using the pinMode function. This time however we are using the variable “ledPin” to stand in for the number 13. We are also using pinMode to set a different pin with value “buttonPin” as an input. These are two of the three variables that we created by the sketch’s initialization code. Naming our variables give us a way to refer to numbers we need in our sketch in a meaningful way and makes our code easier to read.
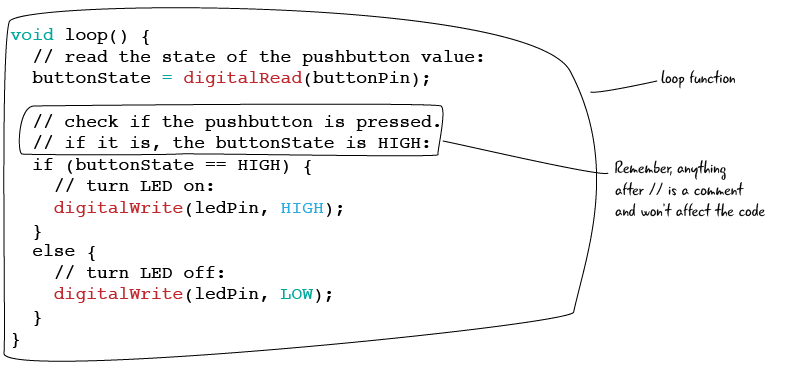
Let’s take a closer look at what we mean by digital input.