Chapter 3: Parts of the Arduino IDE
Parts of the IDE: understanding the code window
We’ve heard about the parts of the Arduino IDE, now let’s take a look at them more closely.
![]()
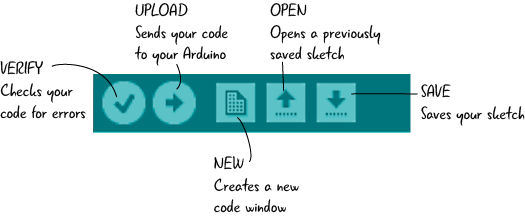
As in most software, there are menus that allow you to perform various actions, such as creating new files, saving them and many more at the top of the software interface. There are button icons that also allow you to quickly access some of the most often performed actions. Clicking the verify button checks to make sure there are no errors in your code. Clicking upload transfers your code from your computer to your Arduino so it can run on your Arduino board. There is a window where you type your program, and message areas that give you information about that program. We’ll explain more about messages as we work in the IDE, for now know that they tell you if your code has errors, and also information like the amount of space it uses in the Arduino’s memory. For now, don’t worry about how much memory your code is using as we will cover it later in the book.
Let’s look a little closer at the buttons at the top of code editor.
These buttons allow you to quickly access the actions that you will perform most often with the code window. These actions include checking if your code has any errors (verifying), sending your code to the Arduino board (uploading), creating a new file, opening a file and saving it.
We will use all of these buttons in just a moment, but first let’s be clear about what writing a sketch actually means.
The sketch: the basic unit of Arduino programming
You can think of an Arduino program, or sketch, as one full group of instructions to perform specific tasks. A sketch includes all of the code, or instructions, for that task or tasks. It’s possible to have multiple, separate sketches open at once — like a spreadsheet program can have more than one sheet open at a time. Let’s take a closer look at what forms a sketch.
Every program you upload to your Arduino is considered a “sketch.” A sketch can be quite simple or extremely complex. It could turn a single LED on and off, or it could control 10 or more motors based on sensor input. While each sketch corresponds with one task, that task could be made up of multiple parts. For example, your program may take measurements of the world (like light levels) and use them to trigger speakers and LEDs. All of that would go in one sketch.
The name of the sketch appears in a tab in the upper left hand corner of the code editor.
![]()
Opening an example sketch:
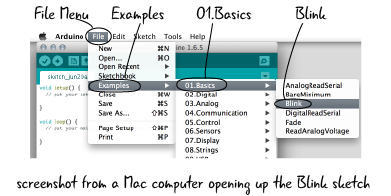
Before we start to write our own code, we will use an example that is included in the Arduino IDE. The IDE has a lot of examples (sample code) that demonstrate many of the things that the Arduino can do built into it. You can load an example into the code window and upload it to your Arduino when it is attached to your computer.
We’re going to first open up the example sketch named Blink. To open this sketch, go to the File menu, select Examples, 01.Basics, Blink as shown in the screenshot below.
Saving your sketch
By default, your Arduino sketches will be saved inside the Arduino folder within your computer’s Documents folder. It is a good idea to continue to save in this space since it makes it easier to return to the files. Arduino also keeps track of past files saved inside this folder in the drop down “Sketchbook” inside the file menu.
Even though we are using code from an example, it is a good idea to save it now with a different name so that we can always return to the original unadjusted example code later. That way when we make changes and save our sketch we will know we have not saved over the “Blink” example sketch accidentally. Save your sketch as “ATG3_Blink” so that you will be able to find your changes later.
Save early, save often!
It is a good idea to get in the habit of saving. Just like you wouldn’t want to lose work from a paper or another project, saving early and often can help save frustration if for some reason your computer closes the Arduino IDE (losing power, momentary hiccup, etc). While this is highly unlikely to happen, the one time it does you will be happy that you don’t have to repeat all the work you did because you saved your project and don’t have to worry about it.
Uploading a sketch to the Arduino
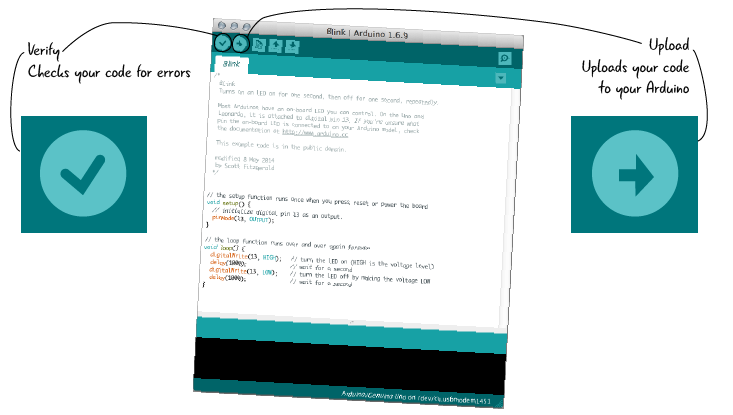
Now that you’ve saved the example sketch with a new name, it’s time to upload it to the Arduino. Before you upload it, let’s check it for errors. Even though you are using the code that is built into the IDE, it’s a good idea to get in the habit of always verifying your code before you upload it.
There are two buttons we talked about in the IDE section which we need to keep in mind when we are ready to upload our code: Verify and Upload.
Step 1: Verify your sketch

Verifying ensures that your code is setup correctly. Click the Verify button to make sure there are no errors. Unless you made changes to the Blink sketch before you saved it, everything will work fine. The message window at the bottom of the IDE will say “Done compiling” and show no errors as shown in the picture below.
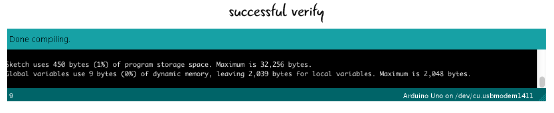
It won’t notice if you have the correct pins selected or the right sequence of events, but it can notify you if there are programming issues with your code. We will cover these issues in depth as we progress through the book.
Step 2: Upload your sketch
When we type code into the Arduino IDE window, the code looks something that humans can read, but the Arduino doesn’t understand how to interpret it. When you click on upload, your computer converts the code into a language that the Arduino understands. Your computer then sends this program over the USB cord to your Arduino, giving it the group of instructions to follow.
Uploading continued: status bar and message window

Once you click on the Upload button, the Arduino IDE window will give you a status bar indicating how much progress the upload has made and a message window with information such as the size of the sketch. That progress bar and message window looks something like this:
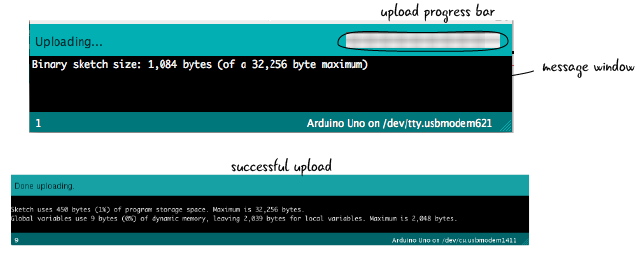
Once the file is done being sent to your Arduino, it will say “Done Uploading.”
That’s it! Now your code from the IDE window is now running on the Arduino.
Run Blink Sketch
Now that you’ve uploaded your sketch to the Arduino, as long as the Arduino has power from the computer through the USB cable, it will keep running. The code that we have uploaded to the Arduino contains the instructions that tell the Arduino to blink the light over and over. The LED near Pin 13 will turn on and stay on for one second, then turn off for one second, over and over again. We will look at the code in detail in a page or two and see exactly how it works. 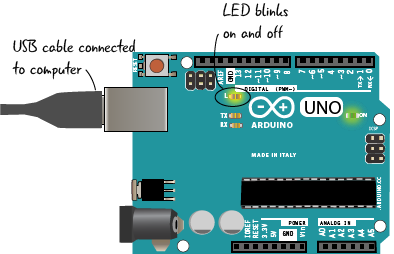
If your blink sketch is not running, we can turn again to the methodical process best used to find the issue preventing your code from working. We have seen this before with our electronics, and it is known as Debugging.