Chapter 6: Using the serial monitor
Using the Serial monitor
The serial monitor is a feature of the Arduino IDE that shows us information sent from the Arduino. It is helpful for de-bugging and for learning what values a sensor or variable resistor produces. To open the Serial Monitor, click the button at the top of the Arduino IDE.

When we open the serial monitor, we see a window that displays responses from the Arduino. and a drop down menu that controls the rate of communication, or baud rate, between our computer and the Arduino. As we said before, the baud rate is the rate of communication that the computer and Arduino use to talk to each other. By default, the baud rate of your serial monitor will be set to 9600, which matches the value we set in the serial.begin() function in our setup code, so you shouldn’t have to make any adjustments.

The Arduino and computer must use the same rate of communication: the value set in Serial.begin()
Here’s what the serial monitor window looks like when running this sketch:

Now that we understand where to find our serial monitor, we can talk about our use of serial in the loop code.
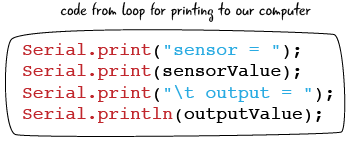
Looking at the serial code
The Serial library has 2 functions for sending information to our computer: Serial.print() and Serial.println(). Our sketch uses both of these functions in order to format the information on the computer screen. The serial code in our loop includes the four lines below:
All four of these lines of code together print the single line in the serial monitor which includes the words “sensor =”, the value of our sensor, a tab, the text “output = “ and the mapped value. Here’s an example of a line of output this code will display in the serial monitor.
![]()
Sending words to the serial monitor: Strings
If we look at the first serial.print line, we see words and quotation marks around them. In order to send words to our serial monitor, we use something called a string.

A string is a representation of text in a programming language. Any letters, numbers or other alphanumeric characters (including spaces and punctuation marks) are represented by strings in our code.
Why do we need strings? Computers normally only work with the value of numbers. Sometimes you need to use text in your code, to pass along textual information, or to give context to other data. We will see how this works as we look more closely at our code in the next couple of pages.
How do we use strings in our code? We place quotation marks around a string to identify it. The quotation marks enclose the full group of characters including all of the letters, the spaces, and the punctuation.
Text is represented by strings in our code. Any alphanumeric character, including spaces and punctuation marks, are represented by strings.
Printing to the Serial monitor
Now we’ll take a closer look at how each line of code prints to the Serial monitor. We know that any text inside of quotation marks is a string and will be represented as text. We also see our variables referenced in the code. Let’s look at how these work together with Serial.print()
Everything inside the quotation marks will be printed to the serial monitor including spaces and punctuation

The first line of the code prints out the string sensor = (including the spaces before and after the equals sign.
The second line of serial.print() will print out the value of the variable sensorValue, which is a number. Without quotation marks, the Arduino will print out the numeric value stored in the variable, rather than the name of the variable.
The third line for our serial loop code uses quotation marks again, so we know that we are going to print a string . However, we also have a new symbol: What does that “\t” mean? The \t tells the Arduino serial monitor to include a tab, a set of spaces, in your printed output.
The fourth line prints the value of our outputValue variable. But instead of Serial.print(), we use Serial.println(), which will print a line break. We’ll look at this more closely on the next page.
Remember, the values for sensorValue and outputValue you see in your serial monitor will look different than in this screenshot, and will change as you turn your potentiometer.

We have seen that our final line of serial code uses Serial.println() rather than Serial.print(). We learned that Serial.println() automatically adds a line break; how does this affect the way our code appears in the Serial monitor?

The line break means that the next time we print something to the serial monitor (including the next time through our loop code) the printed serial information will appear on a new line.
The only difference between Serial.print() and Serial.println() is that line break, which can make it easier to read the information in the serial monitor.
Serial.println() includes a line break which makes the serial info easier to read
Don’t forget, the numeric values for sensorValue and outputValue will look different in your serial monitor when you run the code and turn the potentiometer.

And because this code is in loop, the lines will appear over and over again. The values of the variables will change if we turn the potentiometer.
What do those values mean and how do they relate to the scales of numbers we looked at before? sensor is the value derived from reading the voltage (0-5) on pin A0 and setting it to a range from 0 – 1023 with the analogRead() function. output is the value of sensor mapped to a range from 0-255 by the map() function to be used by pin 9.
the final loop code line: delay()
Here is the final step in our sketch:
5. Wait a short amount of time (2 milliseconds) before our next reading
This is accomplished with a single line of code including the delay() function we have seen in past chapters.

a short delay at the end of sketch keeps our code running smoothly and our sensor readings accurate
This delay pauses the the program for just a short moment so that there is enough time to take another sensor reading. There is a limit to how many accurate sensor readings can be taken every second, so the delay helps to space out our sensor readings just long enough to maintain good readings.
ATG6_AnalogSerial summary
As we’ve seen, our loop code reads an analog value from an analog input pin, scales that value down to a smaller number, writes the analog value out to a PWM pin, and prints the results from all of those steps to our serial monitor so that we can see a readout of how the value changes.
The analog output value –which can be any number between 0V (off) and 5V (fully on) –changes the brightness of our LED. At an intermediate point such as 3.5V the LED will be less bright than at 5V. What else can we modulate in this way? Next we will hook up the speaker and change the notes that comes out in a more dynamic way than we did in chapter 5.
Questions?
Q: Are there other functions in the Serial library besides Serial.begin(), Serial.print() and Serial.println()?
A: Yes, there are quite a few, including Serial.write() and Serial.read(), which are also used to communicate with our computer. We will see how these work later.
Q: Why do we bother using the special character “\t” to create a tab? Are there other special characters I need to know?
A: Using “\t” makes the output in our Serial Monitor much easier to read, that’s the only reason we use it. There are many special characters: one that can sometimes be useful is “\n”, which creates a new line. This formats the text in a similar way to using Serial.println(), it adds a line break
Q: I’ve heard of strings before, they are a way of describing text in other programming languages, right?
A: Yes, alphanumeric characters, including spaces and punctuation, are called strings in many programming languages.
Think about this…
What other information might you want to send from your Arduino to your computer to help you in de-bugging your projects?
We have sent analog sensor readings in the past, but you can also print strings (to check if something happens, like a button press) or digital readings.
We’ve seen how our potentiometer can give us a range of values when hooked up to an analog input, and how to map those values in our sketch to get values we can use with a PWM output pin. Now let’s add a speaker to our circuit to create a theremin.