Chapter 3: Downloading and installing the software
Downloading the Arduino IDE: getting started
The IDE we will use to program our Arduino is free and available on the Arduino site. The installation procedure is slightly different for the Mac platform than for the Windows platform, we’ll walk you through download and installation for both of them.
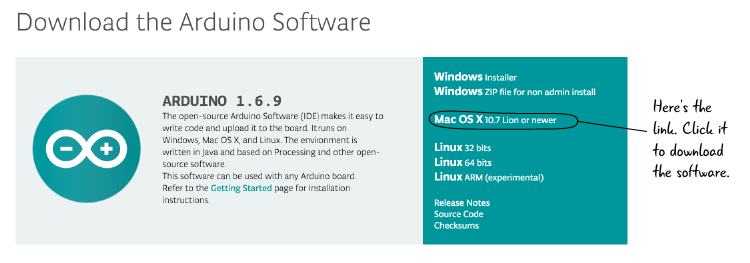
Here’s the URL where you can find a link to download the IDE.
http://arduino.cc/en/Main/Software
If you are using a Mac:
The download page will look something like the screenshot below. Web sites change frequently, as does software, so it may look different when you visit it. Click the link to download the Mac version of the software. Make sure you download the latest recommended version of the Arduino IDE for Mac.
When you click the link, a zipped version of the Arduino IDE will start to download. It will be in the default download location on your computer, most likely the Downloads folder. When it has finished downloading, double click the zipped file to unzip it. The unzipped file will be named Arduino.app. If you don’t see .app, don’t worry, as it means that your computer is set to not display file extensions.
![]()
Move the Arduino.app file into the applications folder on your computer.
![]()
You have downloaded and installed the Arduino IDE on your Mac.
If you are using a Windows computer:
Downloading and setting up the software for a Windows PC is very similar to the steps taken for a Mac computer, but there are a few additional minor steps we need to take in order to ensure the computer and the Arduino can communicate.
First you’ll have to download the software. The URL where you can find it on the Arduino website, in the same place as the Mac download. Make sure you download the latest recommended version of the Arduino IDE for Windows.
http://arduino.cc/en/Main/Software

We recommend you use the link marked Windows Installer. If you are sharing the computer, for example using a computer at school or work where you are not the only user, you may need to download version marked non-admin install.
When it is finished downloading, there is a .exe file named with the Arduino version in your default download location, generally the “Downloads” folder. Double click on this file to start the installation process.

The first dialog box askes you to agree to the Arduino License Agreement. Clicking “I Agree” will take you onto the next step of the installation.
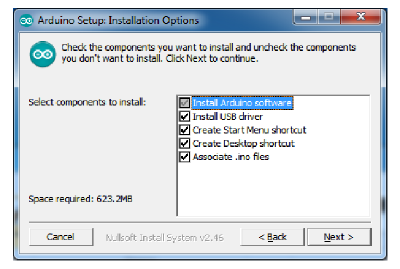
With the Arduino Setup Installation options, make sure that the “Install USB driver” and the “Associate .ino files” boxes are checked. The “Start Menu shortcut” and “Create Desktop shortcut” are optional but will both help you navigate to the Arduino IDE in the future.

Depending on your settings and your version of Windows, you may get a Windows security pop up box asking about the “USB Driver” installation. Click install any time a security dialog box pops up to allow the Arduino IDE to be installed completely.
That’s it! Now your Arduino IDE is ready to run on your Windows PC.
Connect your Arduino Uno to your computer
You’ve installed the Arduino IDE, so now it’s time to connect your Arduino to your computer so you can program it.
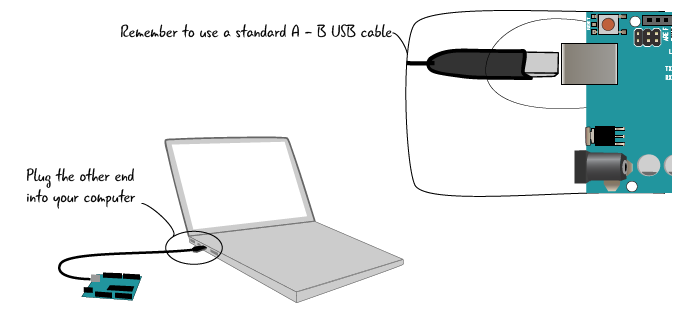
Plug your USB cord into the Arduino, and plug the other end of the USB in to your computer.
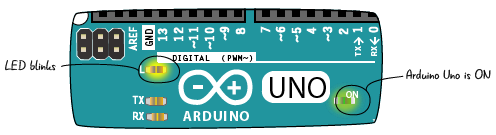
The LED marked ON should light up, and if your Arduino is brand new out of the box, the light near pin 13 should be blinking, just like when you tested plugging your Arduino in for Chapter 1.
The Arduino IDE: what’s in the interface
Let’s take a look at the Arduino IDE now that we’ve have launched it.
The Arduino IDE allows us to check whether our Arduino is connected to the computer, check our code for errors, upload any code we write to control our Arduino, and a few other helpful options for understanding how the Arduino is behaving. We’ll look at all of the features in much more detail before we start to write code for our Arduino.

A program we write in the code editor for the Arduino is called a sketch. When you launch the software for the first time you will see the bare bones of a sketch. We’ll explain how the code that’s there is used as we start to program our Arduino
One peculiarity of the Arduino IDE is that if you close all of the sketch windows, the IDE will try to close. Fortunately, Arduino will warn you if it is about to happen, but it can be shocking the first time.
There are some settings we will need to configure before we start programming. Let’s look at them now.
Configuring the IDE: the settings we need to change
There are two important settings that need to be configured in the Arduino IDE so your computer can communicate with your Arduino Uno. We need to specify which version of the Arduino hardware, or board, we are using, and which connection or port we will be using for communication between the Arduino and your computer. These settings will be the same as long as you are using the same Arduino Uno. (The settings will be different if you are using another Arduino. We are using the same Arduino for all of the projects.)
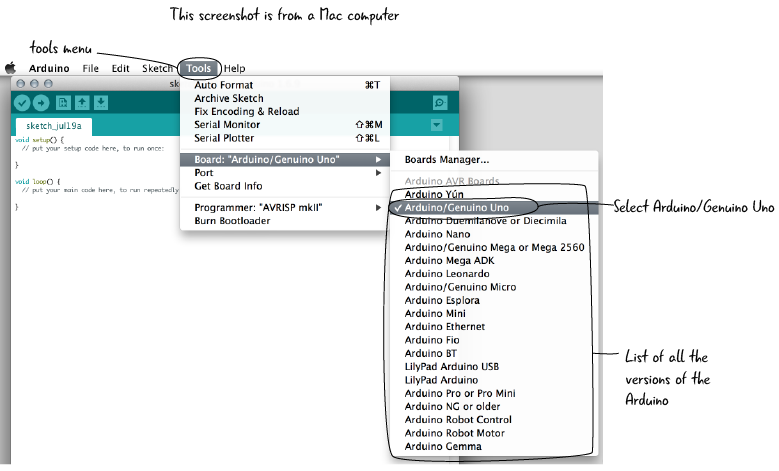
Specify the version of Arduino hardware
We saw in the intro chapter that there are many different versions of the Arduino. In order to program ours, we must indicate in the software which version of the Arduino board we are using.
To do this, go to the Tools menu, select Board. From the fly out menu, select Arduino Uno/Genuino. Once this is set, we will have to set a port through which our Arduino will communicate with our computer.
Specify which port you are using
There is a port on the Arduino that communicates with a port on your computer when the two are connected by a USB cable. Think of the port as the channel through which the two devices speak to each other. Right now, you need to set up the Arduino IDE so the correct port on your computer communicates with your Arduino.
Selecting the right port looks slightly different on a Mac or Windows computer. We’re going to look at screenshots for both of them. Remember, we’re setting up our computer to talk with our Arduino Uno, since that is the version of Arduino that we are using for the projects in this book. Let’s look at Mac, if you have a pc you can skip ahead to the next section.
A Port is a channel of communication which connects your Arduino and the computer.
Mac port selection
To set the correct port for your computer to communicate with the Arduino, go to the Tools menu, select Port. 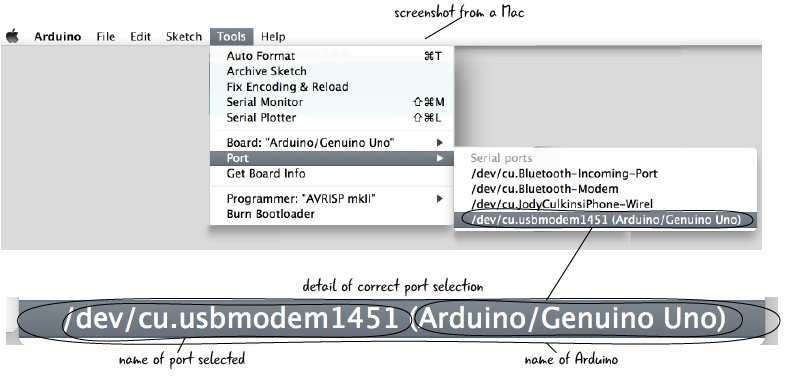
On a Mac, select the port that contains dev, tty and is labeled Arduino Uno. Dev is a prefix added by the Mac, tty is short for teletypewriter, and harks back to earlier days in computing and communications, while Arduino Uno is the version of Arduino hardware we are using. In the example above the number at the end of that menu item is 1451; on your screen, this will be different from this example, and might be different each time you connect your Arduino.
Nothing bad will happen if you select the wrong port, but the Arduino and your computer won’t know how to talk to each other. If it seems that the Arduino and your computer aren’t communicating, take another look at your list of ports and make sure you’ve selected the right one.
Windows port selection
Let’s look at the port selection on a Windows machine.
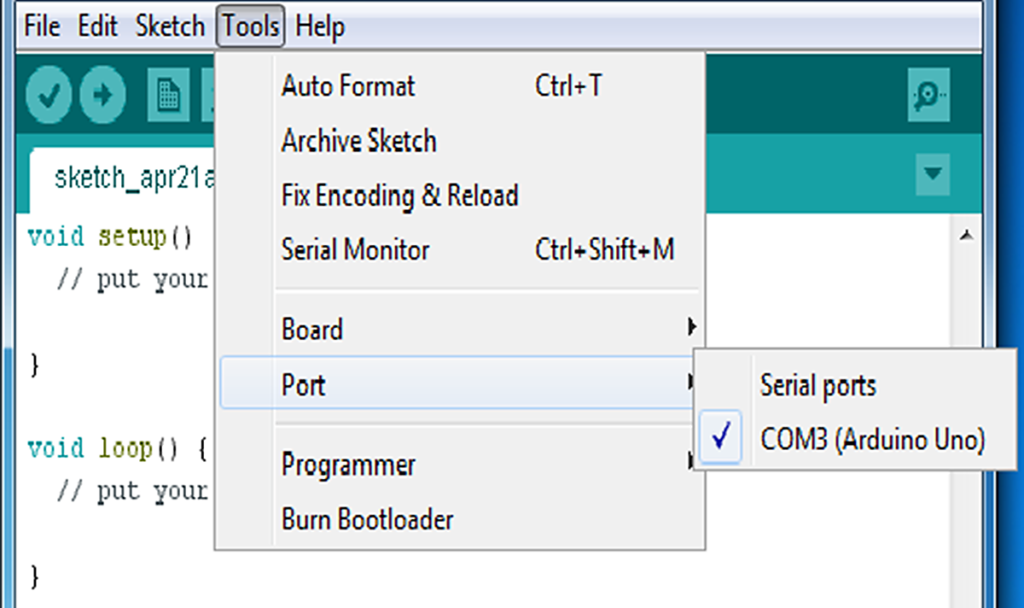
On a PC, the port names start will all start with COM. You want to go to the Tools menu, select Port, and select whichever COM number matches up with the Arduino Uno/Genuino label under Serial ports. In this example, the correct port is COM 3(Arduino Uno/Genuino).
Questions?
Q: Will I always choose the port that says Arduino Uno/Genuino?
A: Not necessarily. That is the version of the Arduino board we are using in this book, so all of the projects in the books use the Arduino Uno, but you may want to use other versions of Arduino as you build your own projects later on.
Q: Sometimes there are other ports listed in the dropdown. What are they?
A: Those are other ports that use different means for your computer to communicate with other devices. Don’t worry about them, as we will not be using them.
Q: What if I don’t have my computer hooked up to the Arduino, will I see the port to connect to my Arduino then?
A: No. In order to see the correct port, you must have your Arduino and computer connected with a USB cable.
Now that we have set the port and the correct Arduino board, let’s take a closer look at the Arduino IDE used to create our code.