Chapter 3: ATG3_Blink overview
ATG3_Blink Sketch: an overview
Here’s a screenshot of what the ATG3_Blink sketch looks like. We’ll go over every part of it in detail, this is a quick overview of the parts of the sketch.
Comments are notes to the programmer in the text that are not part of your program. In an Arduino sketch, setup is where you put part of your program that only happen once, and loop is where you put what you want to happen over and over again.
In this sketch, all of the code in setup and loop is written in the Arduino programming language. If you look at the code in the Arduino IDE, you will see that parts of the code are different colors; some is orange, some blue, some black. Don’t worry right now about exactly what these colors mean, we will explain it later.
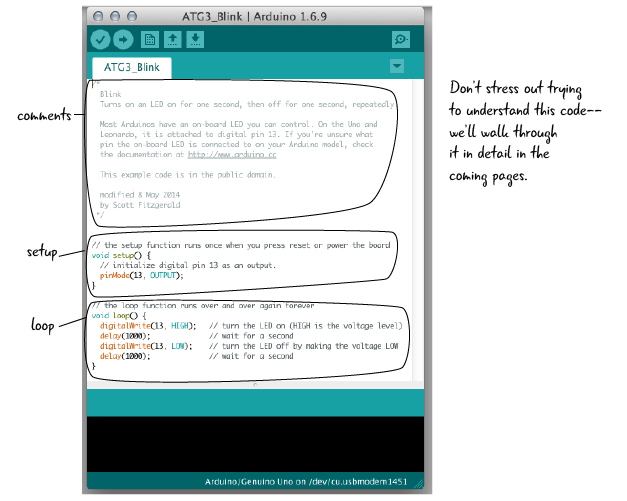
In the Blink sketch, all of the code in setup and loop is defined by the Arduino programming language.
We’ll look at all the parts of a sketch in detail shortly, but first let’s look at the comments section at the top of the code.
Comments: letting others know what you’re thinking
Comments in code are used to write notes to the anyone who might read your code. This might be you, when you return to a sketch you created earlier, or others who you are sharing your code with. Comments have no effect whatsoever on how the computer interprets the text and are only there to remind you or clue someone else in on what you intended to do, or how the program functions as a whole. We will use comments throughout our code examples to help explain sections. It is a good habit to get into writing comments to yourself so that you can return to a sketch later and remember what is going on.
The first part of the ATG3_Blink sketch includes a comment about how the file works. This comment is long, with lots of information, but comments are sometimes short, just a word or two. As you can see from this example, comments sometimes have information about the author of the code and the date. In this case it also tells us that the code is in the public domain.
In the Arduino language, as in many other popular languages, there are a couple of ways to indicate comments. Multi-statement comments start with these characters /* and end with these */ which allows for entire blocks of code to be commented out. Single statements comments start with // and end when you hit enter to create a new statement. Sometimes the single statement comments are at the end of a statement of Arduino code. Anything written after the double slash (‘//’) will be ignored, until the next statement.
The example below is the top section of our ATG3_Blink sketch showing the comments at the beginning of the sketch:
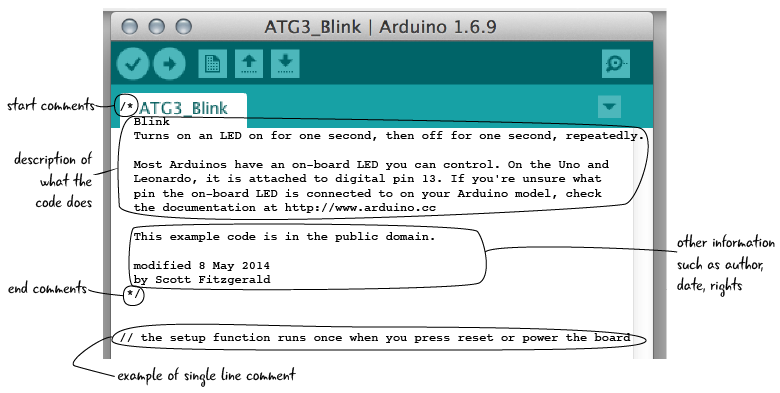
/* and */ denote the beginning and end of a block comment
// indicate single line comments
setup() and loop(): the guts of your code
Comments, while important, are not instructions to the Arduino. In an Arduino sketch, there are two basic sections, the setup function and the loop function.Here’s a diagram that shows how setup() and loop() work: setup happens once, followed by loop which repeats over and over.

setup() is the name of a function that is included in every Arduino sketch. What’s a function? Just think of it is a way of organizing code or instructions to the computer.
Function: A way of grouping statements of code or blocks of instructions to the computer
Generally speaking, anything that you want to only happen once in your sketch belongs in the setup() function. setup() is run exactly once every time that your Arduino is reset.
setup() and loop() connected
We are going to take a look at the rest of the Arduino code for the ATGA3_blink sketch, but first let’s look at a couple of example projects. We will use these example projects to help you gain an understanding of the difference between the setup and loop sections of the code.
Examples: How does setup and loop apply to the projects?
Example 1. Later on in this chapter, you will be building an SOS signal light which will flash an LED on and off in an SOS pattern continually with the timing controlled by the programming.
Setup is where you will set the pin that controls the LED to an output, telling the Arduino which pin will control the LED.
Loop is where you will put the code that controls the timing, turning the LED on and off continually.
Example 2. In a later chapter, you’ll build a digital Etch-a-Sketch and you want it to respond to user controls.
Setup will tell the Arduino to which pins the controls are connected.
Loop allows us to continue checking if the user has touched anything (moving left/right, up/down, or erasing the sketch).
Example 3. Let’s say you want to build a digital music box which plays different sounds depending on what button you press, and you want to include a volume control knob.
Setup will be used to assign different buttons to each of the songs and which pin responds to the knob.
Loop will be focused onresponding to button presses, and playing each song when the corresponding button is triggered. The loop would also look for changes in the knob, which would change the volume.
We’ve seen some examples of how setup and loop work, now let’s take a look at what the setup function looks like from the ATG3_Blink sketch we have just uploaded and have running on our Arduino.