Chapter 5: Add a button
Digital input: add a button
We are ready to get our parts together to start building a circuit with a button.
You’ll need these parts:
- 1 LED
- 1 220 Ohm resistor (red, red, brown, gold)
- 1 10K Ohm resistor (brown, black, orange, gold)
- 1 momentary pushbutton switch
- Jumper wires
- Breadboard
- Arduino Uno
- USB A-B cable
- Computer with Arduino IDE
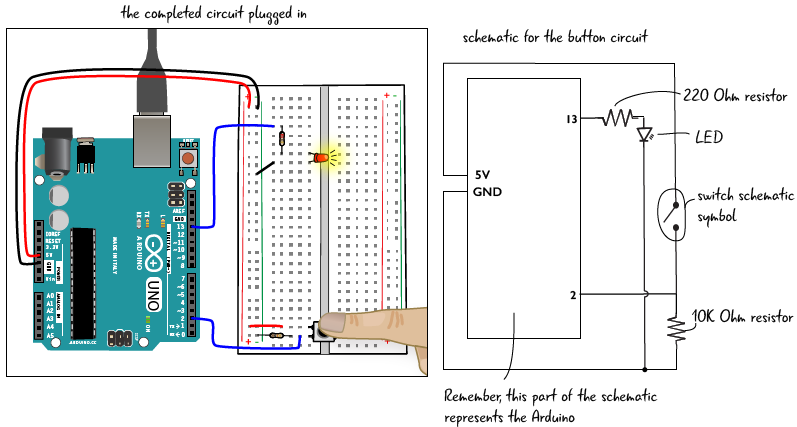
Here is a preview of what the circuit will look like when it’s built, as well as the schematic. Since the schematic is a bit different from those we have seen before (it includes some new symbols), we will take a closer look at it on the next page.
Understanding more complex schematics
The schematic for this circuit follows a couple of conventions that we haven’t seen before.
At the bottom of this schematic, there is a small circle that indicates that the cathode of the LED (remember: the cathode is the LED’s short lead or negative side) on pin 13 is connected to the same ground as the resistor that is attached to one end of the switch. A filled circle is often used in schematics to indicate connection points.
As schematics become more complex, you sometimes have to run lines that are NOT connected over each other. To indicate that these lines are not connected, we draw a little loop like the one on the right side of this schematic.

Building the button circuit
Before we add the button to the circuit, we need to rebuild the circuit we used with the ATG3_Blink sketch in Chapter 3. Here’s a quick overview of how to do that, follow along and check each step as you go:
- Attach the power and ground from the Arduino to the power and ground busses on the breadboard.
- Connect a jumper from pin 13 on the Arduino to a row of tie points on the breadboard.
- Connect a 220 ohm resistor to the same row of tie points as pin 13.
- Connect the anode (long leg) of the LED to the other end of resistor, and jump the cathode (short leg) of the LED to the ground bus.
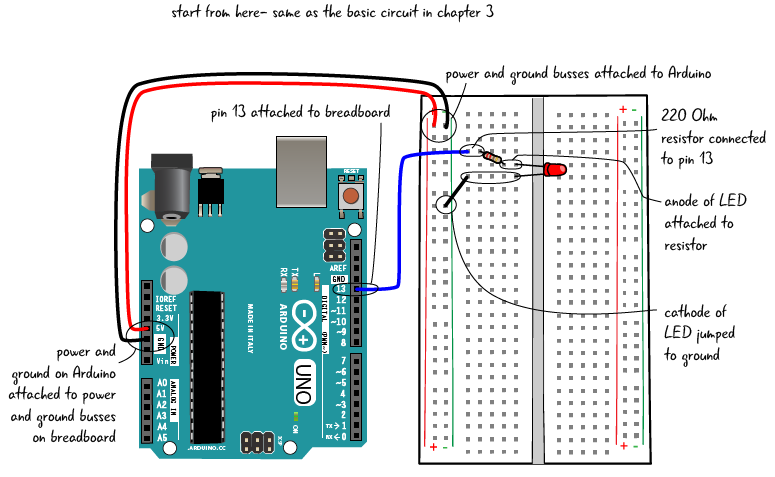
Now that you’ve got the basic circuit assembled, We’re going to add a button. We’ve looked at the schematic for a button, but before we put the button in the breadboard, let’s look at how the button we are using is constructed.
Adding the button
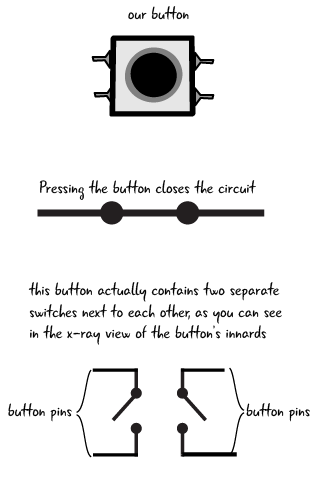
The button we’re going to add is a pushbutton switch (a.k.a. a momentary switch). While we are pressing the button the LED will turn on, and as soon as we lift our finger the LED will turn off. This type of button gets it’s name from just being toggled for the moment.
When the button is pressed, the circuit is closed, and electricity can flow through it like the diagram we saw earlier in this chapter.
This button actually contains two separate switches, (that’s why it has 4 pins sticking out of it). which both close when we press the button down. Our circuit will only use one side of the button.
Remember the trench that runs down the middle of the breadboard? (You learned about it in Chapter 2). Our button is going to be placed across the trench, with 2 pins inserted into the row of tie points on on each side. The button will only fit across the trench in one orientation. Placing your button across the trench insures that it is oriented correctly, with each pin connected to a separate and discrete row of tie points. As long as the button fits across the trench the button direction will not matter. 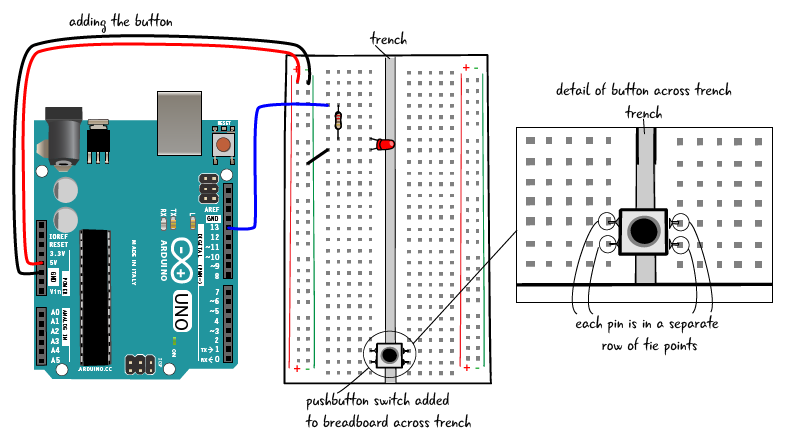
We are placing the button near the end of the board to make it easier to add all of your components.
Connecting the button to power, a resistor and ground
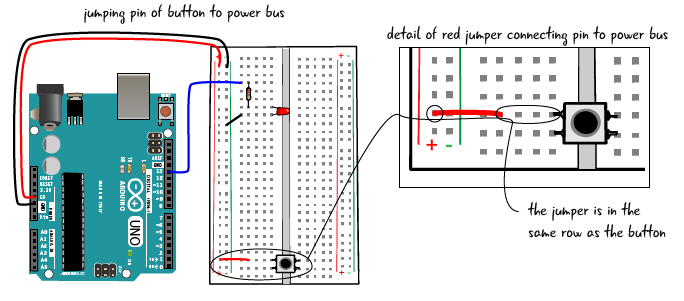
We’ll continue wiring the button. Add a red jumper that connects the power bus (the one with the ‘+’ sign) on the breadboard to the top left side of the button.
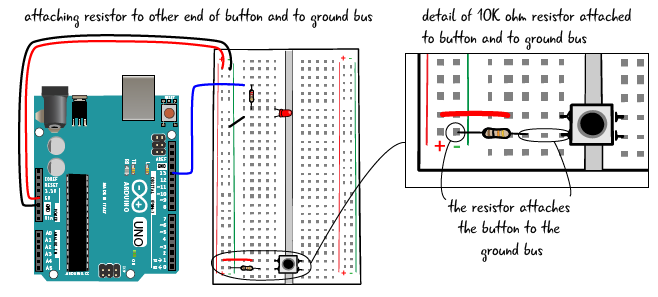
Next, attach a 10K ohm resistor (colored brown, black, orange, gold). Attach one of the resistor’s leads to the button, and the other lead to the ground bus (the one with the ‘-’ sign), as shown in the diagram below.
Next, we’ll attach the button to a pin on the Arduino.
Attach the button to an Arduino pin and upload a sketch
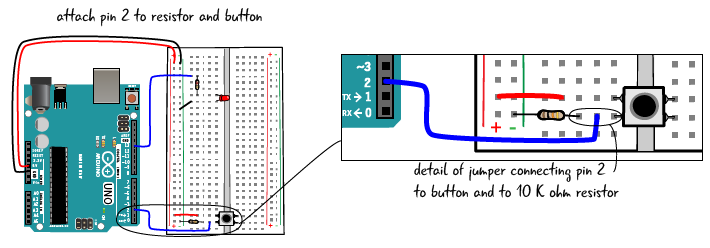
Finally, attach a jumper to pin 2 on the Arduino. This jumper will be attached to the 10K ohm resistor that is attached to the ground bus; As you can see below the resistor, jumper to the pin and one of the pins of the button should all be in the same row of tie points. The jumper wire also needs to be in between the resistor and the button.
The button is all hooked up, so you can mark off the next item on our checklist. Now that the Arduino is attached to the breadboard and the button is wired up, hook up the Arduino to your computer so you can upload a sketch that will control the behavior of the button and the LED.
Open sketch, save, verify and upload
Attach your computer to the Arduino with the USB cable so you can upload the Button sketch. This is one of the example sketches that comes with the Arduino IDE.
Launch the Arduino IDE, and then open the Button sketch by choosing File > Examples > 0.2 Digital >Button.
Save the button sketch as: ATG5_Button.
Next, click the verify button first to make sure your code is ok.
Then click the upload button to upload your code to the Arduino.

Turn the LED on and off
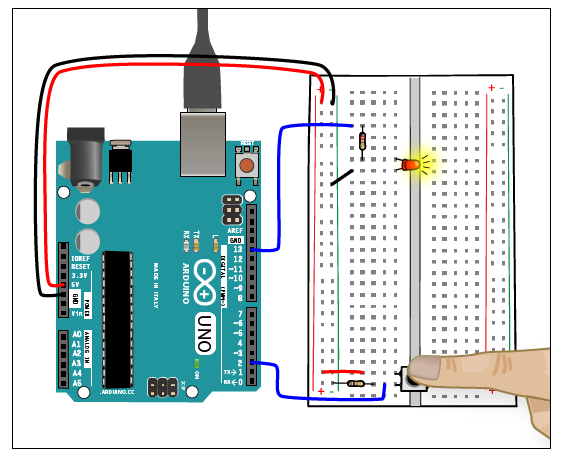
Now when you press the button, the LED will light up. That’s already much more interactive than your earlier circuits, and we’re not even halfway through this chapter yet.
Questions?
Q: Can I use other types of switches or buttons that I find?
A: Yes! All switches and buttons work on the principle of either closing the circuit (making a complete loop) or opening the circuit (breaking the loop). There is a section in Appendix B which will look at the specifics about types of switches and buttons.
Q: Can I use a single button to trigger more than one output? For example, could I use one button to trigger a whole string of lights?
A: While one button can be programmed to trigger many different things at the same time, most electronics have one button per function because that setup makes it easier for the user to understand exactly what is being triggered. If the same button triggers many functions, the user can be confused as to how the interaction works.
We’ve built the circuit and looked at the schematic. Now let’s take a look at the code for ATG5_Button in detail.